How To - Bridging GNS3 to a wireless NIC (linux and windows)

Posted by Ahsan Tasneem | 2:10 AM | , , , | 0 comments »

While poking around the new GNS3.net forum, I found two very interesting howto posts. Jeremy Grossman (gns3 author) describes the processes needed to bridge a wireless NIC to GNS3 using both Linux and Windows.
Here are the links:

Multicast Stream – Tandberg MXP 990

Posted by Ahsan Tasneem | 5:13 AM | , , , | 0 comments »


Make sure that the PC is connected to the same LAN (or multi-cast enabled WAN) as the codec that is to be streaming
Note: The entire configuration related to my IP settings are erased or replaced with ‘X’. Please let me know if you face any problem, and keep following @ahsantasneem for more

Step 1: Static Public IP assignment, entering in all the IP fields for address, subnet mask, and gateway and DNS.


Configuring Cisco Secure ACS for Windows PEAP-MS-CHAPv2 - [Part 2]

Posted by Ahsan Tasneem | 5:02 AM | , , , , , | 0 comments »

Configure the Wireless Network Connection

Complete these steps:
  1. Log off and then log on by using the WirelessUser account in the wirelessdemo.local domain.
  2. Choose Start > Control Panel, double-click Network Connections, and then right-click Wireless Network Connection.
  3. Click Properties, go to the Wireless Networks tab, and ensure that the Use Windows to configure my wireless network settingsis checked.
    peap-acs40-win2003-81.gif
  4. Click Add.
  5. Under the Association tab, type Employee in the Network name (SSID) field.
  6. Select WPA for the Network Authentication and ensure that Data Encryption is set to TKIP.

Configuring Cisco Secure ACS for Windows PEAP-MS-CHAPv2 - [Part 1]

Posted by Ahsan Tasneem | 5:00 AM | , , , , , | 3 comments »

Introduction
 I was working on improving and managing (logging) the security of my wireless network and for this purpose I was searching for steelbelted RADIUS which used to be a freeware, but recently I found that Juniper bought it and its no more freeware now. Therefore I started looking for an alternative and I found one that is Cisco ACS. My plan was to place RADIUS behind the wireless routers placed in my office and authenticate the users trying to connect to Wifi through RADIUS server preventing the unauthorized users access and also generate their logs. Below article helped me in the process I have also specified the changes done by me to make things work. The procedure mentioned below is for the workgroup environment not for the Domain environment.


Do let me know if you face any problem I'll be posting more on this soon keep following @ahsantasneem

[Contd..]

Pemu – Pix Emulator with GNS3

Posted by Ahsan Tasneem | 11:20 PM | , , , , , , | 0 comments »

The guys at GNS3.net have done it again! They just released version .04 of their incredible network emulation software. There are lots of new features including Pemu integration, c1700 and WICs Support and Project feature (you can keep router configs, nvram …).
Here is a full list of the new features:
  • A dynamic mode (no design/emulation modes)
  • A new .net save/load.
  • c1700 and WICS support.
  • PIX emulation.
  • Dynamips’s ATM bridge.
  • Capture feature for links from the GUI.
  • IDLE PC calculation from the GUI.
  • GUI improvements (save the window state when closing GNS3 …)
  • Annotation feature.
  • Project feature (you can keep router configs, nvram …)
  • NULL NIO support.
  • PDF export.
  • New languages.
I'll be posting more on this, keep following @ahsantasneem. Do let me know if you face any problem.

How To - Connect GNS3 to the internet in MacOSX

Posted by Ahsan Tasneem | 11:14 PM | , , , | 1 comments »

We have issued tutorials for connecting Windows or Linux to a physical network using gns3, but apparently, there is a little difference for MacOSX.  I recently received an email from one of our readers, Ivan Pletenev. Ivandescribes how to connect GNS3 to internet through wifi-interface in MacOSX. You will find his writeup below. Thanks Ivan!
To set up this connection we need to do 2 things:

  1. Connect MacOSX and GNS3 through loopback-interface
  2. Set up NAT in MacOSX

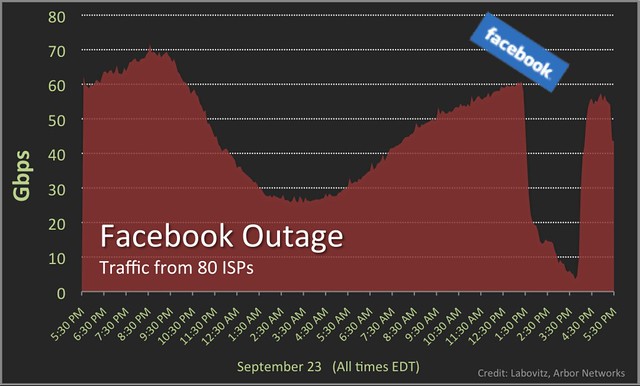
Facebook Outage - Shown in Graph

Posted by Ahsan Tasneem | 2:24 PM | , , | 0 comments »

ATLAS data to graph Facebook (AS32934) traffic with 80 ISPs around the world between 5pm September 22 and 5pm EDT today. You can see Facebook traffic plummet around 1:30pm and return shortly after 4pm. From a quick glance at the data, the outage appears to be global (impacting all of the 80 ISPs).


We have no information on the root cause (no sign of obvious BGP instability or DDoS).
Lots of speculation on twitter.


Related Articles
"Worst Outage in The History of Facebook" - Facebook Engineer Explains

"Worst Outage in The History of Facebook" - Facebook Engineer Explains

Posted by Ahsan Tasneem | 2:50 AM | , , | 1 comments »

Facebook Software Engineering Director Robert Johnson was kind enough to explain to a curious public exactly why Facebook went down earlier today, calling the mishap “the worst outage we’ve had in over four years.”
In a brief blog post, Johnson discussed today’s downtime, which began around 11:30 a.m. PST. The site wasn’t functioning again for most users until around 3 p.m. PST.
Today’s outage was unrelated to another period of downtime yesterday, when issues with a third-party networking provider caused problems for some users trying to connect to Facebook.
Johnson said the downtime today was caused by “an unfortunate handling of an error condition” involving an automated system designed to verify configuration values in the cache and replace invalid values with updated values from the persistent store.

How To - Make a DMG package from GNS3

Posted by Ahsan Tasneem | 9:50 PM | , , , , , , | 0 comments »


This step-by-step procedure will show you how to make a DMG package from the GNS3 source code. I’ve built the package on Mac OS X Snow Leopard and used Py2app to make a Mac OS X application. Also, have a look at this article that really helped me.
This procedure worked for me, please let me know if you encounter any issue and I’ll update it. Also, please tell me if you can make it work on Mac OS X Leopard (10.5.x).

How To - Run GNS3 on Mac OS X

Posted by Ahsan Tasneem | 9:46 PM | , , , , , , , , , , | 2 comments »

Here are instructions to run GNS3 from the sources (not the standalone compiled DMG version) on your favorite operating system. You will have to install or compile dependencies like Qt, Sip and PyQt. This will allow you to use the latest development version of GNS3 that you can download from http://code.gns3.net.

Method 1

  • Install the Apple Devs Tools (on your Mac OS X DVD or download it on ADC account). Run and install XcodeTools.mpkg.
  • Download SIP, open a terminal and go in the folder where you downloaded the tar file and compile using the following commands (example for SIP 4.9.3):

How To: Use MRTG with GNS3

Posted by Ahsan Tasneem | 11:24 PM | , , , | 0 comments »


What is MRTG?

  • MRTG is opensource program which gets traffic statistics from devices using SNMP and builds graphs like this:

Installing MRTG

How To: Emulate Cisco ASA in GNS3

Posted by Ahsan Tasneem | 11:21 PM | , , , , , , | 0 comments »

In this article, I will show you how to emulate Cisco ASA using Qemu. Once again, please note that ASA is not provided and will not be. So please don’t ask. Also be aware that ASA does not 100% work in Qemu but that’s enough to play with it.
Installation
First compile and patch Qemu as you would do for running JunOS. This will give us pcap, lcap and UDP tunnels (i.e. GNS3/Dynamips connections) capabilities.
Then obtain ASA itself. If you are smart and patient you will find it. I used asa802-k8.bin for my installations. As far as I know, nobody has been able to run ASA > version 8.2 (ASA keeps rebooting).
The next step is to get an initrd and a Linux kernel (inside the initrd) from your ASA image to use them with Qemu and also fix the initrd for our needs. The initrd is zipped and archived in the ASA image, we have to extract it.
There are 2 ways, manually or using a tool I created.

How To - Step By Step Installation of JunOS on GNS3 [Part 4]

Posted by Ahsan Tasneem | 11:08 PM | , , , , , , , , , , , , , , , , , , | 0 comments »


Testing

To check if everything work, let’s configure 2 Olives:
root@%cli
root>edit
[edit]
root#

[edit]
root#set system root-authentication plain-text-password
New password:
Retype new password:

[edit]
root#set interfaces em0 unit 0 family inet address 10.0.0.1/8
[edit]
root#commit
commit complete
Configure the other device using the same commands but with another IP address (e.g. 10.0.0.2/8) and ping.

How To - Step By Step Installation of JunOS on GNS3 [Part 3]

Posted by Ahsan Tasneem | 11:06 PM | , , , , , , , , , , , , , , , , , , | 1 comments »

Updating JunOS
You can update your version of JunOS from the CLI with the following command:

request system software add [jinstall_package]

Running your router(s)
Now you have a base olive image. Qemu allows you to use this as a base for other images and only writing the changes to your “slave” images saving on disk space! You can also use less memory for each Qemu instance.
Create a new image off of your base image. Repeat for all your routers you want to emulate:

qemu-img create
-b olive-base.img -f qcow2 R1.img

Start your router and then telnet to it:
2001 Once logged in, you can type “cli” to launch the JunOS command line interpreter, exit to … exit and halt to shutdown FreeBSD. Remember to kill your qemu instance(s).
qemu R1.img -m 96 -nographic -daemonize -serial telnet::2001,server,nowait \
-localtime -net nic,macaddr=00:aa:00:60:01:01,model=e1000 -net user telnet localhost


How To - Step By Step Installation of JunOS on GNS3 [Part 2]

Posted by Ahsan Tasneem | 10:24 PM | , , , , , , , , , , , , , , , , | 3 comments »

FreeBSD installation

Now that we have qemu installed, we can create the image for installing FreeBSD. Run this command to create it and allocate 4 GB:
qemu-img create -f qcow2 olive-base.img 4G
Launch Qemu to install FreeBSD on the image:
qemu -m 256 -hda olive-base.img -cdrom 4.11-RELEASE-i386-miniinst.iso \
-boot d -localtime
Qemu window will pop up (remember, by default press CTRL + ALT to release the cursor in Qemu):


freebsd_install_1


How To - Step By Step Installation of JunOS on GNS3 [Part 1]

Posted by Ahsan Tasneem | 10:22 PM | , , , , , , , , , , , , , , , , | 7 comments »

This article explain you how to emulate Juniper JunOS on a PC using Qemu. This is an updated and enhanced version of excellent howtos from Juniper Clue and Internetwork Pro as well asHimawan Nugroho’s blog. I mainly focused on Qemu, so if you wish to install JunOS on a real PC or using VMware, please have a look at the Juniper Clue article for more information (and of course Google).

So what’s new you would say? First, I chose to use the latest version of Qemu: the 0.11.0 which supports the Intel e1000 network card emulation since version 0.10.0. and includes several fixes for it. I have modified and adapted the old patch for Qemu 0.11.0, it includes the UDP tunnel (connection to Dynamips/GNS3), PCAP and LCAP support. Also, the patch allows multicast traffic with the e1000, i82557b and i82559er Qemu emulated network cards. Moreover, this article show how to emulate JunOS on multiple operating systems: Mac OS X, Windows XP and Linux Ubuntu 9.04 without using an untrustworthy obscure binary downloaded from a forum you can’t even read the language 


Top Ad networks for Publishers - Google Adsense Alternatives

Posted by Ahsan Tasneem | 5:16 AM | , , , , , , , | 8 comments »


I am getting a lot of emails for suggesting new ad networks. One of the reason for this is adsense is not excepting new publishers (why not sure !) may be because they have better options available for them comparatively and other is people are not making much money out of their ad networks. There is no harm in trying out new things

Here is the list of the most popular and top ad networks or you may call them the Google Adsense Alternatives:

Fring Challenges Skype With $0.01 Per Minute VoIP Calls

Posted by Ahsan Tasneem | 9:53 PM | , , , | 0 comments »

The mobile voice over IP (VoIP) service Fring now allows its users to make phone calls to land line and cell phone numbers anywhere in the world with prices starting at one cent per minute. Not all calls will be that cheap. Calls to Canada start at 0.4 cents per minute, and calls to India start at 1.1 cents, for example. But it’s more competition in a very small space currently dominated by Skype and to a lesser extent Google Voice.
You used to be able to make Skype calls using the Fringapplications for mobile phones like the iPhone and Android devices, but following the launch of the iPhone 4, Skype and Fring got in a bit of a scuffle and Fring users were left in the cold — no Skype access.

How To - Multiple Olives On One Box Using Vmware

Posted by Ahsan Tasneem | 11:04 AM | , , , , , | 0 comments »

Creating virtual serial ports for telnet access (so no physical com port access required)...
Having one Olive box is great for CLI familiarity but multiple Olives interacting with each other is the only way to really get to grips with the routing protocols and route filtering techniques. Once one Olive session is fully built, it's a piece of cake to mirror this so you can have 2 or 3 or more (resources dependant) on one box. The main limiting factor of this approach is the lack of physical serial ports on the server. Mine only has a single COM1. To get round this, I used the FREEWARE
HW Virtual Serial Port v2.5.10 software from HW-group. Using the command line (or creating shortcuts in the Windows user profile startup folder so it was persistent), I created 3 new virtual serial ports that were setup as telnet servers (COM2 on port 2009, COM3 on port 2010, COM4 on port 2011) so I can telnet to these and be "attached" to the various Olive console ports. Yes, this does mean my doctoring of the cable above was interesting, but not entirely necessary.


How To - Installation of J-Web (Allows Web Based Administration Of Olive)

Posted by Ahsan Tasneem | 5:35 PM | , , , , , , , , | 0 comments »

J-series Juniper routers automatically come bundled with J-Web (click here for the complete J-Web 8.3 PDF user guide - 1.81 MB). When an Olive is built, the software believes it is an M series device, and does not install J-Web, however if you have the install module, it's a piece of cake. I have installed J-web 8.3 to each of my Olive virtual machines and the process is as follows:

First look at the new Twitter Web interface - Facebookification

Posted by Ahsan Tasneem | 11:31 AM | , , | 0 comments »

Take a first look at the new Twitter web interface. Here's what we love, dislike and want more of from the redesigned site.
On Tuesday, Twitter announced major changes to the way users can interact with its Web interface. It is nothing short of a total multimedia makeover.  The new Twitter means a better, more enjoyable user experience for users. There’s more to see, more to do and more to engage with, without having to leave Twitter.
The new Twitter will be rolled out slowly over the next few weeks to all users, but today we can show you exactly what that looks like, as reported by Wired.

How to Submit Your Blog/Website to Google, Yahoo, Bing

Posted by Ahsan Tasneem | 10:32 PM | , , , , , , , | 3 comments »

Blogging is the latest passion for youth presently. Many young people were turning their careers as bloggers. Its possible because of the Globalization. Many new and young bloggers were evolving every year. According to recent Technorati analysis over 1.8 million blogs were been registering every year. These statistics tell us the power of Blogging.
Blogging is not such a easy task. You need to be patient, need to write act smart, need to be updated, need to perform SEO, need to work on building relationship, and many more tasks.
This is the article, that Im writing for sake of serious bloggers who are turning their career as full time dedicated bloggers.


[How To] - Ping Your Sitemap to Google, Yahoo, and Bing

Posted by Ahsan Tasneem | 3:12 AM | , , , , , , | 7 comments »

XML sitemaps inform search engines about the pages available to crawl on your website. Search engines find new pages by navigating links on websites. Sitemaps enhance search engine crawling by providing explicit information about the specific urls on your website. Sitemaps don’t ensure that your webpages will be indexed, but they typically increase both the chance and speed of indexing.
If you have fresh content on your blog or website, it is prudent to make sure the search engines know about this to get the content indexed as soon as possible. One way this is done is by pinging your xml sitemap. Although there are many search engines and services you can ping your sitemap to, make sure you concentrate on the big 3: Google, Bing, and Yahoo.

Step By Step - Installation, Configuration & Usage Guide of GNS3

Posted by Ahsan Tasneem | 2:15 AM | , , , , , | 0 comments »

Installation of GNS3


  1. File download
  2. The file is downloaded from http://www.gns3.net/
    Because all necessary things are packaged, this is recommended for Windows in "win32-all-in-one.exe".


GNS3 Installation Hypervisor Load Balancing - 2

Posted by Ahsan Tasneem | 1:32 AM | , , , , , , , | 0 comments »

PART 7: START GNS3 ON THE SERVER AND CREATE SIMPLE TOPOLOGY


GNS3 Installation Hypervisor Load Balancing - 1

Posted by Ahsan Tasneem | 2:16 AM | , , , , , , , | 0 comments »

THIS PROCEDURE MADE UP WITHIN MULTIPLE PARTS:

1. Directory structure 2. GNS3 configurations
3. Configure Hypervisor
4. Edit Dynamips on the client
5. Edit Dynamips on the Server
6. Start Dynamips on SVR and Client
7. Start GNS3 and create simple topology


Step-By-Step Guide of Making Money from Google Adsense in Pakistan

Posted by Ahsan Tasneem | 10:57 PM | , , , , | 2 comments »

Our blog readers are constantly demanding for a “Step-By-Step Guide of Making Money from Google Adsense in Pakistan” so we finally decided to write this post tohelp everyone earn and make some extra money online in Pakistan or anywhere else for that matter.
Let us clarify one point very openly that the Google Adsense is not a Get-Rich-Quick scheme and its not that easy to make money through it. You need persistency, patience, and real smart work to make some reasonable income through Google Adsense. Please take it as a business which grows gradually, it’s not going to happen overnight you’ll have to learn it step by step. So, here is the step one.

Top 20 Proven Tips to Increase Blog Traffic

Posted by Ahsan Tasneem | 10:54 PM | , , , , | 1 comments »


Traffic is the lifeblood for any blog or website because no matter how good is your content, you need to attract more readers by using different traffic generation techniques. Traffic is undoubtedly the number one concern of every blogger because it simply means more money to them.
“How to increase blog traffic?” is the most frequently asked question in every bloggers or webmasters

Leaked Google Documents Reveal How Much Big Brands Spend on Search Ads

Posted by Ahsan Tasneem | 10:41 PM | , , , , | 0 comments »

Ad Age has obtained an internal Google document that highlights some of the biggest AdWords buyers for the month of June 2010, offering insight into how big brands are using Google and how much they are spending.

According to the documents, the biggest buyers of AdWords in June included AT&T Mobility, Amazon, eBay and BP. Although most of those companies are frequent big Google spenders, BP was a newcomer to the list, spending $3.59 million on search ads in the wake of the gulf oil spill (compared to just $57,000 in the two months prior).

3rd Party Drivers – OSx86

Posted by Ahsan Tasneem | 12:41 PM | , , , , , , , | 0 comments »


This is a list of known 3rd party, independently developed drivers for OSx86 which aren't shipped with the Standard OSx86 Installation DVD. So feel free to add your own tested and working drivers.
If you don't find a driver for your device, you may also try to patch an existing kernel extension to add support for your device.

Installing Asterisk Graphical User Interface - AsteriskNow

Posted by Ahsan Tasneem | 7:45 AM | , , , | 0 comments »

This tutorial is meant to guide you during the installation of "Asterisk GUI".The Digium's Asterisk GUI is available only for version 1.4 of Asterisk. This tool is part of Digium's most recent project - AsteriskNow.

1. Requirements
In order to install "Asterisk GUI" you'll need:

Concurrent Versions System (CVS)
asterisk 1.4 - and all modules needed to compile and install asterisk 1.4

2. Preparation

Go to your installation directory (for example '/usr/src') and download the latest version of asterisk-gui. To do this just execute the command:


Installation of Asterisk on Fedora Core

Posted by Ahsan Tasneem | 6:44 AM | , , , , , | 0 comments »

The first step that you should make is to you to choose which version of Asterisk you want to install.

* Asterisk 1.2 - the stable version
* Asterisk 1.4 - the version that is currently in beta testing

When you know which version you want to install download the according packages.

Note that we will install also libpri and zaptel packages. They are optional for Asterisk but if you want to use Asterisk with MeetMe (see
MeetMe application and meetme.conf) or to use MusicOnHold you'll have to install zaptel. The TDMoE cards will also need the zaptel module in order to work correctly. If you will use PRI cards you'll have to install libpri module.


Configuring the Asterisk PBX using the freePBX interface

Posted by Ahsan Tasneem | 4:47 PM | , , , , | 0 comments »


Here we will configure Asterisk through the freePBX administrative interface to properly route both incoming and outgoing calls (In this example we have used Callcentric to route both incoming and outgoing call). This guide assumes that you have installed freePBX using either the freePBX package, trixbox or a method of your choice. This guide also assumes that the freePBX install steps were completed properly and that you have administrative access to the freePBX administration interface.
Note: For those who don’t know registration on callcentric.com is free and all these steps can be done once you signup.

We recommend that you read each step through in its entirety before performing the action indicated in the step.


How to connect Skype to 3CX [Part 1]

Posted by Ahsan Tasneem | 5:09 PM | , , , , | 0 comments »


3CX installed on PC and Skype installed on the same PC.


We have 3CX <> SIPTheeSkype <> Skype Client <> Skype Network.


Notice that you may set up SIPThee Skype on different machine, but SIPTheeSkype and Skype client must be installed on the same PC. You can also run SIPTheeSkype on Linux box...

Pwnage 2.0 – Jailbreak iPhone 3G now !

Posted by Ahsan Tasneem | 4:35 PM | , , , , , | 0 comments »


Download Pwnage 2.0.1 Version 2.0.1
The new Pwnage tool 2.0 is out. It will activate, unlock and jailbreak your 2G iPhone, and “jailbreak only” your new 3G iPhone. No 3G unlock yet!


Hardware Compatibility List (HCL) - OSx86

Posted by Ahsan Tasneem | 10:06 PM | , , | 0 comments »

Hardware

  • Confused about EFI? Read all about it on our new EFI page.
  • What is DSDT? Read more in our DSDT page.


  • Visit our TPM Resource Center for everything you've ever wanted to know about the Trusted Platform Module.

Tips and Tweaks

  • Having a problem with your audio card? Is your USB printer broken? How about PowerPC apps? Our Tips And Tricks page covers these problems and much more..
  • If your OSx86 installation is running slowly, please check out ourSpeedBoost section.
  • Finally, SSE2 patches will help you get PPC apps working on older SSE2 machines.


[Mac OSx86] 10.4.8 VMware Installation Guide
How To - Install Mac OS X Leopard OSx86 on PC Dual Boot Windows 7, Vista in 9 Easy Steps
How to Install Snow Leopard on PC [Hackintosh]

Related Posts Plugin for WordPress, Blogger...